Heart-to-Heart with Diane

Hello and Welcome! Isn't raising a family the greatest!? I know I've got the best job in the world, just being Mom! I love sharing things I've discovered that make being "Mom" better, easier or more fulfilling, and that is what this blog is all about. Welcome!

Thursday, July 30, 2009

You're in a Pickle


"You're in a pickle. Just say sorry and get out of it!"

This little line still makes us laugh! Louisa was still relatively young when she first piped up with it in a moment of tension. Whenever I asked a family member a question, and they hmm'ed and hah'ed and made an excuse, she would quip: "You're in a pickle. Just say sorry and get out of it!" And right she was! Excuses are just that, excuses . . . not the answer that mother needs.

It's amusing how we try to save face. Pride must be our reason, but it is refreshing to hear honest answers instead. I would always rather hear a plain, "No, I didn't do it yet. I'm sorry" than a cover story about why not and whose fault it was and more.

To take the blame—when the blame is rightly yours—is a noble thing to do. No alibi, no explanation, just a pure and simple admission that something went wrong and the fault was yours. That person has integrity and I admire that!

I'm thankful for a child's crystal clear perception of the situation. Whenever anyone in our family starts to weave an excuse, someone says with a chuckle: "You're in a pickle. Just say sorry and get out of it!" It is so refreshing to stop trying to save face.

Labels: , , ,

Monday, July 27, 2009

Best Math Product on the Market!


. . . according to me!

Math-it was the first homeschooling resource I bought as a new homeschooler 23 years ago, and I used it homeschooling every one of my 7 kids. I wore one set out and had to buy another, but it has been worth every penny.

Math facts are to math like the phonics is to reading. You just have to learn them to progress in math, and they are the basic building block of every formula and every math problem. When they are mastered, your children will be more fluent in math, enjoy it more and do better at it. Everyone agrees on that idea. But how?

I've tried lots of math resources, and still use many of them, but nothing teaches math facts like Math-it. The reason lies in the teaching method. Most products that teach math facts do it the rote way: memorize it and practice the heck out of it to keep it memorized. Which means that if your memory is lagging, you are stumped.

Why Math-it works is that it teaches the student how to figure out the math facts. So, if their memory fails, it is possible to figure out the answer. Sweet relief! "How-to" is always more effective than relying on rote memory.

For example: learning the "9 times" is easy when you realize that every answer consists of two digits that add up to 9. Take the math fact 4 x 9 = 36. The digits in the answer add up to 9 (3 + 6 = 9). The first digit of the answer (3) is easy to figure out because it is just a count back one (from 4 to 3). This works on every 9x multiplication fact.

Here, do this one with me: 7 x 9 = ?

For any number multiplied by 9, just take that number (7) and count back one (to 6). Write it down. That is the first digit of the answer: 6_.

Now, taking that number (6), count on your fingers up to 9. How many step counts from 6 to 9? The answer is 3. So write that down next to the first digit (6) you wrote down. Now you have 63. That is the answer to the problem. You can check that you are right by adding the two digits in the answer: 6 + 3 = 9. Isn't that amazingly tricky!?

Once your child has a formula, a way to find the answer, the math facts lose their mystery. I listen to my friends who have children in public school who spend the entire 4th grade learning their times tables. The children have charts and contests and flashcards and drills. It seems to occupy a lot of time, and be a burden and cause of stress for some kids. Why? It is easy, once you have the tools to figure out the facts.

The games included in Math-it are called: Add-it, Double-it, Half-it and Times-it, plus there is a CD with the manual that you can print out. The manual is illustrated and teaches you how to play the games, how to present the math facts to your students. I don’t know how any teacher gets along without this program! Take my advice and laminate the game boards and cards before you wear them out like I did.

Instead of teaching your child to memorize math facts, give them the skills to never "forget" them again!

Shop for Math-it in my store: click here.

Labels: , ,

Thursday, July 23, 2009

Home: Showcase or Workshop?


Homeschooling and a clean house don't seem very compatible. Well, it can be clean, but it doesn't seem to remain uncluttered very long.

The scene of conflict: my dining room table. I clear it off, put a vase of pretty flowers in the center, and enjoy the bareness of it for about an hour before an art project, the sewing machine or the computer sneaks back to stake a claim on my table. The battle raged for quite a season before I decided a perspective change was the solution. I strung up the white flag and finally made peace with my dining room table.

The cause of the battle was whether my home was to be a showcase or workshop.

A showcase:
It does bring a thrill of satisfaction and order to see it clean and neat and shining, everything in its place! I admire my friends' homes when I enter to see everything where it belongs and things clean and nice. It gives peace to the atmosphere. All is in place. Everything in order. Visitors welcome without any feeling of embarrassment. Ah . . . that is not my home.

A workshop:
While you are raising kids, and especially if they are in your home learning all day long, you can take the attitude that your home is going to be a workshop, a place where the daily work of learning and growing goes on. When you enter an artist or a scientist's workshop, you expect something to be in the center of the table, creation in process. You don't want to see a bare table, because that means the artist is not inspired, not working, not creating.

Of course, children have chores, they must learn to keep things clean, and put things away. I am not advocating chaos—just creativity—and a more relaxed attitude on the part of Mom for her inventing-doing-learning precious ones. My husband and son went to scout camp, and while they were gone, the girls and I left our violins out everyday, setting on the love seat. We are all taking beginning violin lessons (me too!) from a generous mom in our homeschool group. It is challenging to get enough practice time in. It was just amazing how much music was played during that week! The easy access and availability made it simple to pick up the violin and spend a few moments playing. And it was contagious . . . the other violins were picked up and played too! I see snatches of sewing being done the same way, when the sewing machine is in easy reach. What I am saying is that neatness can sometimes squelch creativity.

I've tried to move this whole affair of learning and creating that was happening on my dining room table down into my school room in the basement of my house. I told my children they could leave their projects out on the table and work on them whenever they wanted. It could be a workshop table with ongoing experiments!

No success.

I even tried converting Louisa's bedroom, the one nearest the living area, into a workshop. We set up tables and bookshelves and supplies. It was quite a job. No one (including myself) would work in there. It stayed clean and unused!

Sewing really belongs in my sewing area, which is where all my patterns, thread and fabric are stored. Louisa loves to sew and works on projects constantly. Do you think any of us will sew where we are supposed to? No. We'd rather haul the heavy sewing machine, baskets of fabric and thread and patterns up a flight of stairs to clutter up the dining room table.

Why?

Because being together trumps all other factors. The kids want to be where Mom is, and Mom is often in the kitchen or living area. So, the kids and their creative learning stuff gravitates right to the dining room table. No matter how big your house is, the kids want to live in the rather small area that Mom lives and works in. Isn't it true?

I do have a school room area, and as long as I am there, the children will come and read and work. But the moment I transfer upstairs to start a meal, or do laundry, here they all come. So, rather than engage in the ongoing struggle of workshop vs. showcase, I made a truce.

Let my house be a workshop!
Let my children do all the creative learning right in the dead center of the action. Let me enjoy every moment of this learning and experimenting and creating. Not long, I fear, the table will not only be clear and clean—but the chairs around it will be empty.

Hurrah for a thriving, bustling workshop!

Labels: , , ,

Monday, July 20, 2009

A New Way to Garden


Getting things growing—early summer

This year, we decided to try the new version of Square Foot Gardening. Mel Bartholomew, the author that rocked the gardening world in the 1970's with the idea of grow boxes, has revised and drastically simplified his method and written a new book called, of course, All New Square Foot Gardening. No digging, no hoeing, no rotortilling, no raking, no pitchforking, no weeding, all you need is hand tools! . . . by the time I read these descriptions, I was convinced it was the right method of me. Mel has made it so easy, that I was eager to give it a try.

So, after getting my husband enthused, we scrounged used supplies: wood scraps, old carpeting, old buckets and barrels. My husband cut the wood and made it into 4' x 4' frames (approximately—no exactness here). These frames are bottomless boxes. We divided our former garden area in half, keeping half of the space in the "old method" and covered the other half of it in old carpeting we gathered that was being disposed of. Then we moved around the frames on top the carpet, just like arranging furniture, until we got them just where we wanted them. We left plenty of room between the frames, making it easy to maneuver around, but also allowing the plants to spill over into the carpeted area.

Next, we stirred up a soil mixture made to Mel's (the author) specifications: 1/3 peat moss, 1/3 vermiculite, and 1/3 mixed compost (composted from steer, horse, turkey, chicken manure, as well as grass and garden clippings, wood shavings, etc.) by volume. And we filled up our frames. The bottom of the frame was the old carpeting we had spread out. Just 6" depth of his "perfect soil" mixture is able to grow any vegetables or flowers you want! There is no need for any more. Even tomatoes grow in just 6" of this perfect soil.

At first, buying and putting new soil in the frames didn't seem right. It seemed like a cheater's way of gardening. But after years of continually assessing and trying to improve our soil, adding amendments, digging it all in— all the work that involves, and then growing a great crop of weeds (along with some veggies) I decided to listen to what this author had to say. And it made a lot of sense! The book is easy to read and very encouraging. More than this, it is easy to do! This fun read is a very different type of book than his first volume with all its exacting directions. This is the relax-and-enjoy version of an exciting new concept in gardening!

Then we marked off the square foot areas with a grid. We used yarn and just stapled it on one side of the wooden frame, pulled it across the top, and stapled on the other side in square foot divisions— but yarn isn't very permanent. Mel suggests finding old vinyl blinds at yard sales and using the slats to create a grid—he is very practical! The purpose of the grid is to help you plant each square foot in a different plant, creating natural crop rotation, beauty, variety, and abundance.

So, here we are at mid-summer and everything is growing great. Best of all, it is so manageable. The ground is covered with old carpeting, which is faded to a nice "dirt" shade. The soil filled frames are nice and neat looking, and for the first time in years of gardening, I don't "lose" things. Previously, I would plant parsley seeds, but the weeds overtook before the parsley came up. This year I have not only parsley plants, but basil, cilantro, dill, lemon basil, chard, lettuce, carrots and all the other "tiny" lose-able seeds are thriving and producing!

And how is the other half of my garden in the old method doing? Well, the weeds got away from me. I've been out there every morning for an hour at least working at it, but I now have clinical proof that morning glory weeds can grow 12" overnight! I will still get a good harvest of the "big stuff", but all the little seeds are irretrievably lost. The bush beans I planted in the Square Foot Garden are robust and blooming. The bush beans I planted at the same time in my old method garden are struggling along--no doubt the soil is not as rich, nor the water so even due to all those pesky, thirsty weeds.

You can start now! Mel has many informative charts, one of which tells when everything germinates, and how to plant now for fall harvest. This is an ongoing, most-of-the-year project. He even has "how-to" steps for making easy "lids" to cover and protect your crops beyond the normal killing frost.

My experiment is not conclusive yet, but thought I'd give you a mid-summer report!

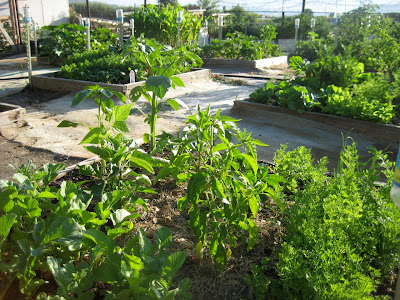
Here's how it looks in mid-July—things are thriving!

Labels: ,

Saturday, July 18, 2009

Refreshing Mint Lemonade


Hot day? Refresh yourself with this super-easy, nutritious cooler!

Mint Lemonade

Fill blender with 2 cups cold water

Add:
1 whole lemon, cut in half
4-5 sprigs mint, stem and leaves

Blend thoroughly, and pour through a strainer.

Return juice to blender and add water and ice to fill the blender. Blend on high until ice is fully crushed.

Add white stevia powder to desired sweetness.

Enjoy this healthy, cool and flavorful drink! It looks sort of neon and tastes much like the Crystal Light brand drink, only it is good for you!

Labels: , ,

Thursday, July 16, 2009

Sting Magic


I was out gardening this morning when suddenly that sharp, paralyzing feeling shot up my hand—I'd been stung! Seems our little farm is wasp-haven, and I am not winning the battle with hosing their nests down from the eaves of my house, and from their various hiding places.

I looked around the grass and found plantain. I don't like to use poisons (hence the wasps, plus the weeds in the grass), so fortunately, plantain was right there, growing in my lawn. I chewed up a leaf and quickly put the pulp on my sting. It's magic—it really is! It always amazes me how fast plantain makes you forget you were stung.

When I came inside to shower, as soon as I washed off the plantain, the sting started hurting again. That plantain is really like magic! It's nickname is "Band-aid Plant" and it is regarded as one of the best healing herbs. The active ingredient is a powerful anti-toxin. Native Americans called it Snakeweed and carried it in their medicine pouches to treat snakes bites. Plantain stops pain quickly, speeds healing, stops bleeding, draws out foreign matter, stops itching, prevents and stops allergic reactions from bee stings, kills bacteria, and reduces swelling. Use it on sprains, cuts, insect bites, rashes, boils, bruises, chapped lips or hands, baby's bottom, and burns.

Something inspiring I learned about plantain is that it grows within a close distance to poisonous plants, like stinging nettle. God gave us the cure right next to the trouble, like he does so often in our lives. I've hunted it down on hikes or at the park, when a child is stung. It grows in most lawns, to the distress of the gardener. It grows most everywhere, including parks, playgrounds and in the cracks of the sidewalk. There is a broad-leaf version (like the photo) and the narrow leaf version. The most distinguishing feature for me is that if you turn over the leaf, there are 5 prominent veins are parallel to each other and run the length of the leaf. It also sends up a stalk with a "cat tail" looking seed-thing on the top. The seeds of plantain are sold as Psyllium, a bulking fiber (to treat constipation).

If you want to have plantain around in the winter, here's some ways to store that magic:

Easiest:
You can dry the leaves and put them in your first aid kit. Chew them just as you would a fresh leaf, and put it on the wound. Works well.

A little harder:
You can also make a Plantain Oil. Just stuff a small glass jar with coarsely-chopped fresh, plantain leaves. They must be dry, so it is best not wash them. (Think that they were rained on or watered recently and they are clean. Pick those away from footpaths or roadsides and you'll get cleaner plants.) Fill the jar tightly with leaves, and pour in olive oil to completely cover. Use a wooden spoon handle to prod the leaves, pushing them down and releasing air bubbles. Make sure all leave are submerged in the oil. Add a little more oil to the top and cap tightly. Put this jar in your pantry on a plate to catch any drips, and leave it be for 6 weeks. If you happen to notice it, you might shake it a bit every few days. If not, it will still be good. At the end of 6 weeks, pour the oil through a strainer, pressing the leaves with the back of a spoon to release all the oil. Label and store in a dark place, preferably in a dark glass bottle. Now, when you need plantain, use the oil just like you would a salve. Rub it on, or drop some on the bandage to put up against a wound or sting.

A little more trouble still:
You can gently heat beeswax to mix it with the oil, at the ratio of one tablespoon grated beeswax to about one ounce of oil. Pour this into a little tub and it will cool into Plantain Ointment.

Fresh is easiest, and works the best—just like magic! Don't let your kids suffer from stings this summer without showing them how to fix it with plantain.

Labels: ,

Wednesday, July 15, 2009

Eat Out!

Summertime! Camping, vacations, picnics, reunions, yard work, swimming, projects . . . there is so much to do, and it seems the summer is slipping by fast. We happened onto a happy way to enjoy summer more without putting in any extra effort. We eat out—literally.

The outdoors is really only a few steps away, and you're going to eat breakfast anyway, so why not take it outside and enjoy the summer light and the morning sky as well as the food?

You don't have to have a pretty umbrella and table. A blanket on the grass does great too. Use a laundry basket or a big tray to save steps when transporting food and dishes outside. One unexpected benefit: spills are no stress outdoors.

Being out in the open air seems to nourish and feed the spirit as well as the body. It is so refreshing! Hope you "eat out" soon!


This breakfast sundae is made of homegrown raspberries,
white peaches, grapes, plain yogurt and peanuts.
Breakfast Sundaes

Unsweetened yogurt
Cottage cheese
Fresh ripe fruits: peaches, pears, berries, grapes . . .
Nuts: almonds, walnuts, peanuts, cashews . . .

Assemble right in the bowl. Deliciously fresh and nutritious!

Labels: ,

Saturday, July 11, 2009

Why?

This is the sky in my backyard. The clouds looks so strange! Why?

Why? is such a good question!

I remember an exercise a teacher led us through in a class I had when I attended the university as a young woman. The class was a Family Science class, and the teacher asked us to raise our hands if we had made our bed before we came to school that morning. We dutifully raised our hands. Then she asked, "Why?" Laughter. Then she asked it again. "Why?" She got us thinking.

Of course, the first response is always, "because we are supposed to" or "because we always make our bed" or "my mom taught me to do it that way". The teacher's point was that we do so much that is not useful, necessary, important . . . that we act like robots a lot of the time, and that it could be cured by asking "why?".

I was pregnant with my first child during this class, and I raised my hand and said, "I made my bed because when I get home, I need to go lay down and take a nap and I like it smooth". She accepted that as a valid reason. But, I loved the excitement I felt when I realized that we don't have to do things "just because". We can decide what we want to do for a good reason. And we can reject things that are unnecessary. We can think "outside the box".

A few weeks ago, one of the moms in my homeschool support group brought her basket of laundry to fold as we talked. I asked her why she folded clothes. (I haven't folded clothes for 30 years, so it struck me as novel!) That teacher had caused me stop and analyze why I did what I did all day with my time, and give up those things that did not serve a purpose. Folding towels and sheets served a purpose—they fit neatly on the shelf. But folding underclothes and t-shirts and the like didn't really matter, I decided. I hang most of what I wanted it to look unwrinkled on hangers to dry, making it easy to transfer to my closet. And the rest of it, even if folded, seldom made it from my nicely folded stacks into my boys' drawers neatly, anyway.

This year, I am doing Square Foot Gardening. The author has written a new book, ALL NEW Square Foot Gardening, modifying the method for ease and simplifying much of what he wrote in his bestselling original book (which sold 1 million copies, making it the bestselling garden book in America). What I love about it is this once-civil-engineer/efficiency expert took a look at gardening when he was first taking it up as a hobby, and asked, "Why?". Why plant in straight lines? Why in rows? Why rotortill? Why thin out plants? Why plant all at the same time? Why?

Does questioning old methods excite you like it does me? I want to sift through them, saving and honoring the truth, and discarding traditions that don't work so well.

I feel sure that no mother comes to homeschooling without doing a lot of questioning, a lot of asking "why?" Why should my little child be gone all day from me? Why do they make the children sit in desks for such long periods? Why do they teach the subjects they do? Why is so much emphasis on testing? Why are children grouped by age, instead of maturity level? Why? . . . and on and on it goes.

Just the process of questioning is exhilarating and revealing. Don't be afraid of questions. Don't be afraid of asking "why?" If the automatic answer includes such ideas as, "that's how it has always been done", or "that is the way we are supposed to do it", you might want to delve deeper. Let your children ask why. Don't be threatened by it. Dare to think outside of the box and you'll discover the reasons—and you can change the way you live accordingly.

It has taken me on many an exciting adventure and journey, just that little ole' question: why?

Labels: , ,

Wednesday, July 8, 2009

Learning through Cartoons

If I've learned one lesson as homeschool teacher over the past 22 years, it is this: people learn best when learning is fun!

I'm not too big on language arts workbooks. They were pretty dismal to me as a student myself, so I couldn't get excited about them as a homeschooling mom. So, we have wandered along trying to find a fun way to learn English in my homeschool. Studying new vocabulary words has taken many forms starting with workbooks and then venturing off into trying computer programs, flashcards, Latin root study, and several other approaches.

Then I discovered Vocabulary Cartoons, a fun, easy-to-remember approach to learning (and retaining) vocabulary words! Everybody likes cartoon drawings, so there isn't any coaxing to get kids going on this book. Besides a humorous visual cartoon, there is an often silly "sound-alike" clue. There are also several sentences using the word so you get the feel of it. Plus, an easy pronounciation guide.

I am learning right along with my kids, and find myself relying on the memory clues. For example, the word "capacious" means roomy and spacious. I learned the word while quizzing my kids on Vocabulary Cartoons, and I later encountered it in Jane Austen's Mansfield Park, describing a room in a mansion. Instantly I saw in my mind's eye the drawing of a skinny boy with a huge cap on, a cap that was spacious. A capacious cap!

Vocabulary words are taken from the SAT test, which gives me a measure of confidence that they are words worth knowing. Each unit is divided into 10 words, with a full page for each word. The words in each lesson are grouped in a logical way, such as all the words with the same prefix. After you study the 10 cartoons and their words, there is a quiz page, allowing you to match the words to a definition, and giving you the chance to plug the words into sentences. I do this quiz orally with my kids, (because cartoons are fun and because I want to learn too) but it could easy be done independently on paper.

The elementary age version says is geared for 3rd-6th grade, but I found it best at about age 10-12 years. It contains 290 words from the SAT test. It is followed by 2 more books, slated for grades 7-12th to prepare for the college entrance exams. I used them in my homeschool in order, starting with the elementary version around 5th grade and going at the rate of a word per day (Monday through Thursday) and a quiz on Friday. At that rate, each book lasted 2 school years. I would rather have the words thoroughly learned than to rush through and forget them.

It is a proven fact that students with mnemonics (memory clues) learn words three times more quickly and remember them far longer. I’ve been delighted to hear my children using their vocabulary words in conversations—our goal, right?! These books have been a great discovery for my homeschool and my kids have loved them!

Have fun reading the comics!

See Vocabulary Cartoons here.

Labels: ,

Q & A on Peasant Blouses/Dresses

Hello!

I am getting a lot of private email questions on how to make peasant blouses. I love to hear from you—but I am falling so far behind on replying! Please accept my apology for not writing everyone back. Maybe using the "comment" section to post questions would work best--then everyone can see the answers. Anyway, I'll answer the questions here and hopefully I'll cover everything.

Q-What type of fabric?
A-Cotton works great. 100% cotton for quilts works fine. If you use 100% cotton, it will have a slightly soft crumbly look (nice) to the fabric after it is washed (not the freshly-ironed look of synthetic blends), but it is very cool to wear. It helps to wash and dry 100% cotton before cutting it out, as it does shrink. You can also use polyester/cotton blend. Also rayon (which is nice and cool but wrinkles a lot). I wouldn't go with 100% polyester or nylon or any other synthetic since it is hot to wear and that defeats the purpose of a peasant blouse.

Q-What pattern did you use?
A- We just are using a very old pattern I had in my "sewing stash" since the '70's! I had sewn it as a teenager myself. Patterns are basically the same over the years—the human form doesn't really change even though fashion does. Since retro is back, I guess this '70's pattern is back too.

A great place to find cheap patterns is at thrift shops. Don't get distracted by the old fashioned drawings on the front, but just look at the shape of the clothes, you can get some wonderful patterns for almost nothing.

I looked through McCalls Easy Stitch 'n Save patterns, which cost about $2.99 and found this one: McCalls 5451. It has elastic around a high waist too, but your could leave that off. If the neck is too low, just add 2" more to the pattern all around the neck edge and the top of the sleeve (which is also a neck edge). It will work out fine. I think every pattern company has some version of the easy peasant blouse.

Q-What pattern did you use for the little girls' dresses?
A-Simplicity 5695

Q-How long does it take to sew a peasant blouse?
A-For a beginner, a couple of hours. Once you get the hang of it, about an hour, start to finish.

Q-How long does it take for a peasant-type dress, like you made for your granddaughters?
A-About the same as a peasant blouse.

Q-Are these in style?
A-I just went on a shopping trip, and peasant blouses were in every store, high priced, as well as lower priced. I was amazed at all the peasant blouses and dresses out there! This is the rage!

Q-I don't know how to sew. Can I do this?
A-It is pretty easy to follow the guidesheet enclosed with the pattern. This is definitely one of the easier sewing projects. Give it a try!

Best success sewing! I'd love to see a photo of your finished projects! And permission to post them?!

Thanks!
Diane

Tuesday, July 7, 2009

Caught the Sewing Bug

Louisa, the seamstress

Louisa just finished sewing her 9th peasant blouse! She even made one for her sister Emily for her July 5th birthday. Making peasant blouses has enabled Louisa to become very comfy with the sewing machine, and she is learning shortcuts too. She has made several sleeve variations and can slap the pattern on the fabric, weight it (rather than pin it) with whatever is handy (cup, trivet, can, notepad) and cut it out in no time at all. This is so fun to see her go . . . to see her sew!

I'm now having a creatively fun time sewing little summer dresses for my granddaughters. We found an easy pattern (Simplicity 5695) that has the same elastic neck and sleeves as a peasant blouse. This is quick to make and takes so little yardage that I am able to use the fabric I have on hand.

First I made Rachel Lily a "kitty-cat dress" with a head scarf and little purse. The dress pattern can be varied with a bottom ruffle, so I made that one for Rebekah. I left the elastic out of the sleeve to create a cool "fly-away" sleeve. Next, I am going to make another variation for Abbie.

Sewing is so artistic! It really is a satisfying to be able to create something useful at such a low cost.


Rachel Lily's kitty-cat dress


Rebekah's dress with cool "fly-away" sleeves

Labels: ,

Wednesday, July 1, 2009

Peach Milkshakes!


Ah, the taste of summer. . . peach milkshakes are so delicious!

I slice my orchard peaches and fill freezer bags or recycled yogurt containers at the peak of the season. Then when we want milkshakes, I chunk off the amount I need.

Peach Milkshakes

1-Fill blender to the 3 cup line with creamy milk. (I use raw milk with the cream on top.)

2-Cap the blender, and while running, add frozen peaches through the cap opening, until the milkshake is thick. This takes approximately 2 cups peaches.

3-Add a little shake of stevia extract to sweeten, if desired.

Serves 4.

Yum!

Labels: , ,